- 4.1 1. Select a Great Webhost
- 4.2 2. Keep Plugins to a Minimum
- 4.3 3. Use DNS-Prefetch / Preconnect For Third-Party Content
- 4.4 4. Use an Optimized Theme
- 4.5 5. Use a CDN
- 4.6 6. Optimize your Robots.txt
- 4.7 7. Remove Tag pages and Media Attachment pages from the index
- 4.8 8. Remove Category pages from the index
- 4.9 9. Add structured data
- 4.10 10. Avoid using AMP
- 4.11 11. Optimize Image Filesize
- 4.12 12. Make sure every image in the media library has an alt attribute
- 4.13 13. Structure pages with one H1 heading and H2 or H3 headings as needed and in appropriate order.
- 4.14 14. Optimize your .HTACCESS file (if you have one)
- 4.15 15. Build 301 redirects in your .HTACCESS file not in a plugin
- 4.16 16. Setup a Google Search Console for your website
- 4.17 17. Submit Your XML Sitemaps to Google and Bing
- 4.18 18. Properly Handle Duplicate Content
- 4.19 19. Fix 404 Errors
- 4.20 20. Fix Crawled Not Indexed Errors
- 4.21 21. Make Sure Your Content is “Helpful”
Summary
Navigate this article:
- Introduction
- What is Technical SEO for WordPress?
- Who is Responsible for the Technical SEO of a WordPress Website?
- The WordPress Technical SEO Guide
- Select a Great Webhost
- Keep Plugins to a Minimum
- Use DNS-Prefetch / Preconnect
- Use an Optimized Theme
- Use a CDN
- Optimize Your Robots.txt
- Remove Tag Pages and Media Attachment Pages
- Remove Category Pages
- Add structured data
- Avoid using AMP
- Optimize Image Filesize
- Make Sure Every Image in the Media Library Has an Alt Attribute
- Structure Pages With Heading Tags
- Optimize Your .HTACCESS File
- Build 301 redirects in your .HTACCESS file not in a plugin
- Setup a Google Search Console for your website
- Submit Your XML Sitemaps to Google and Bing
- Properly Handle Duplicate Content
- Fix 404 Errors
- Fix Crawled Not Indexed Errors
- Make Sure Your Content is “Helpful”
Introduction
In this guide I will walk you through a variety of technical SEO issues and ways to fix them that will help your website run faster and rank higher. While this technical SEO guide is fairly thorough I might link to some more in-depth documentation on specific issues that are more complex or to step-by-step documentation to make things easier on you, these links will open in a new tab/window. It does not matter if you are new to WordPress or a seasoned pro, this guide will help all levels understand technical SEO issues better. However, you may want to hire a technical SEO consultant or agency to help you implement and manage techncial SEO for your WordPress website. My goal with this guide is to help anyone build technically sound WordPress websites that have a better chance at higher rankings.
One important thing to keep in mind while going through this guide is that every WordPress website is different. The sheer amount of hosting packages, themes, plugins, and third-party content addons makes it impossible to write a guide that perfectly fits every site and scenario. The below information is provided in general and may not be the right fit for your website. Always test new implementations and run backups periodically to ensure you don’t lose a functioning version of your website.
The following guide only applies to WordPress.org based websites (i.e. those using an independent hosting sytem) and not to websites hosted on WordPress.com which is licensend and ran by a different company than the non-profit which keeps WordPress up-to-date.
What is Technical SEO for WordPress?
Technical SEO for a WordPress website essentially means the optimization of any of the underlying infrastrucutre and code that creates your specific WordPress-based website and user experience in ways that are known or assumed to help a website rank more highly in search engine result listings.
Who is Responsible for the Technical SEO of a WordPress Website?
In some companies (large and enterprise companies) this means that technical SEO will span across various departments and job titles which can often include an I.T. department, a team of developers, a team of SEOs, Marketing department, Branding department, and Operations. In others (such as SMBs, mid-sized, and regional businesses) it means whoever is working on your WordPress site or you will need to have a basic understanding of some internet concepts such as HTML code, how data is transmitted on the web, and server hardware.
When one or more consultants are involved in the areas that technical SEO requires, they will need to work with each other and someone in-house or agency-side will need to take ownership of technical SEO issues for your WordPress site. We have seen design teams take ownership, in-house SEOs, VPs of Marketing, in-house I.T departments, I.T. consultants, and of course our own team take ownership of technical SEO projects for client WordPress sites.
Before any work is done make sure everyone and all departments / consultants involved understand who is leading the implementation, what the goals are, and how work is being delegated.
WordPress Technical SEO Guide
1. Select a Great Webhost
One of the single most important parts of building a great technical SEO foundation for your WordPress website is to start by selecting a great hosting provider. With over two decades of experience in hosting management I can assure you that a poor webhost will sink a well-built site every time. You have to completely understand your hosting environment and limitations in order to build a great technical SEO foundation.
Here are the minimum features you should be looking for in a WordPress webhost right now:
- SSD Drives
- Unlimited Connections
- No Inode Limits
- Auto Renewing SSL Certificates
- Fast Support
- Plenty of Bandwidth
SSD Drives – Solid state hard drives are faster at boot up and information retrieval than SATA or HDD drives and are less prone to hardware malfunctions. Because of this they offer a faster and more reliable website hosting experience. Most WordPress web hosting services today offer SSD drives, but it’s always a good idea to make sure.
Unlimited Connections / Concurrent Connections – Some webhosts offer what sounds like a great deal but the offer includes an incredibly low number of connections or concurrent connections to your website. A connection is basically when a user tries to load a page or resource from your website in their browser or via another website. Concurrent Connections are when users try to load a document or resource at the exact same time. Many hosting providers limit at least one of these to a low number such as “25 total” or “25 per minute”. This allows the hosting company to reject visitors to your website and/or slow down their experience by a great deal which makes it less expensive for them to operate and provides stability to their systems.
This obviously has implications for your website, if you get popular on Reddit or you have a great TikTok ad running or if your SEO takes off and Google starts bringing more traffic to your website your number of connections or concurrent connections can rise drastically. Most often these artifical limitations are put in place by shared hosting providers (i.e. SiteGround, HostGator, Blue Host, etc…). Make sure you know what your limit is if you decide to use such a service and have plans in place to move to a new package or hosting system if you start noticing that you have hit this limit. Many web hosts will not inform you about your hosting’s concurrent connections capacity or usage unless you ask.
Further Resources:
- Discussion about Concurrent Connections and Connections on StackExchange here: What does concurrent connection mean?
- GoDaddy owned MediaTemple has a great article about Concurrent Connections vs. Website Visitors that I recommend reading here: Concurrent Connections vs. Visitors
No Inode Limits – Another way hosting providers cut costs and reduce your experience is by limiting the number of inodes or “index nodes” a hosting package is allowed. Inodes are a data structure in Unix-style file systems that represent a single object inside of the file system such as a file or a directory folder. Put in layman’s terms this means every file you upload and every folder you create, regardless of the amount of diskspace it takes up, can count against your inode limit. This type of limitation is especially popular with “unlimited storage” hosting providers since they offer you a technically infinite amount of space but with a severe restriction the number of inodes you can host. Another problem is that sometimes plugins and themes in WordPress create a high number of folders you are unware of or in the unfortunate event you are hacked a lot of empty folders can be created in your file system, placing extreme pressure on your inode limit and reducing your ability to upload new images, run backups, add new plugins, or make adjustments to you website.
For these reasons it is my recommendation to select a provider without any inode restrictions as long as the amount of storage space they offer is adequate. If you do have a hosting provider with inode restrictions you should know what that limit is and consider moving your site as you get closer to maxing your inodes out as doing so after you cross this is more difficult.
Auto Renewing SSL Certificates – One of the worst things to happen in technical SEO over the past decade was the rush to give every website an SSL certificate. While encrypting your site itself isn’t bad, the process of renewing an SSL certificate had always been cumbersome and was unknown to most small to mid-sized companies leaving a trail of crashed websites or hacked website broswer warnings when an SSL certificate expired. It could take hundreds of dollars and several days to alleviate the problem once it occurred each year. Things are much different now as most server management software such as cPanel/WHM and Plesk are capable of automatically renewing SSL certificates without causing any pain to the website owners or users and often happening entirely in the background.
The only problem now is that many web hosting providers do not offer what is called “AutoSSL” with their more basic packages that garner a bulk of their marketing spend and new WordPress website signups.
If you are going to build a WordPress website today that has great technical SEO, you need AutoSSL capabilities for peace of mind and to allow you / your technical team to focus on other things. If your website is for a WordPress + WooCommerce ecommerce site or a medical site or a legal website or in any other industry where SSL is virtual requirement, you definitely want to find a hosting solution that provides AutoSSL capabilities.
Fast Support – Unfortunately as their brands grow we have noted some once-great hosting support experiences becoming incredibly lack luster while their pre-sales support experiences improve drastically. Even if you are an expert at web hosting and related subjects, you want a super fast response time in case something unfortunately goes awry with your hosting while you are building or working on the site. You will find most hosting support gets you to a level 1 tech (i.e. person without much or any training / ability to fix issues) quickly OR you will suffer up to a 48-hour wait time for support.
Plenty of Bandwidth – One of the few limitations that makes sense in hosting is your bandwidth. Most often your hosting bandwidth will be measured in the amount of data your website can transfer to users at the same time. Your web host should list this limitation as either Megabytes or Gigabytes per second (MBPS and GBPS respectively). The higher the MBPS or GBPS number, the more data your website can transfer to users. The more users you have visiting your website simultaneously, the more data you will need to be able to transfer. If you select an option with very little MBPS or GBPS and you get a large influx of new visitors their experience will be somewhat or heavily degraded with your website loading extremely slowly. This is a big concern for websites designed to go viral or ones that run great advertising.
If your website transfers large files to each user such as video content or high definition photography or software, then you definitely want to select a hosting option with a high GBPS bandwidth.
Be careful here for another reason too as some hosts list their bandwith in “Bits” and not “Bytes”. The abbreviation for Megabits per second is Mbps and the abbreviation of Megabytes per second is MBPS. A byte consists of eight bits, if a host lists their bandwidth in Bits instead of Bytes it might confuse you into thinking you have more bandwidth than you really do. In some cases this isn’t done nefariously but in error as many even in the tech world constantly confuse Mbps and MBPS, if you are concerned reach out to your potential hosting service and ask them if they are measuring bandwidth in Bits or Bytes.
I also recommend avoiding “Unmetered” or “Unlimited” bandwidth options with shared or less-known hosting providers. This is almost always a scam and you most definitely are not going to be able to use a bunch of bandwidth without a meter or limit as their advertising implies. For example the popular cheap webhost HostGator offers “unmetered bandwidth” for as low as $2.75 per month (current as of publication) however, they have a clause in their Terms of Service which states that your website can not use more than 25% of the bandwith allocated to the server you are on for more than 90 seconds, if your website does HostGator can shut it down temporarily or heavily degrade the user experience by slowing the website down drastically. Bandwidth is less expensive these days than it was 20 years ago, but it still costs a web hosting company real money and you shouldn’t assume they are going to give it to you free or far below their own costs. Instead look for a hosting company with fair pricing for their bandwidth that is upfront about the amount of bandwidth you can use and the costs associated with it, make sure they also provide some way to measure your bandwidth usage over the lifetime of your account and that they provide a way for a temporary one-time upgrade in case your website gets really popular or a specific ad campaign takes off.
What Hosting Should You Choose?
A final tip here, don’t be fooled by “wordpress only” web hosts or even web hosts recommended by WordPress the foundation. While some of them have a decent offering, you can get a great WordPress hosting experience from other hosting service and often at a lower cost without extra complications or even with more benefits. For example some of the WordPress only hosting services have severe restrictions on PHP.ini settings which can make setup a pain, stop you from installing some themes/plugins, or drastically reduces your website’s functionality. Most of them also place all entry-level clients on shared hosting systems that can lag or get bogged down by suddenly popular websites or DDoS attacks, harming the performance of your WordPress-based website.
None of the major WordPress-only hosting services or shared hosting providers currently meet our minimum criteria for a highly optimized WordPress website. We have found that often the best solution for most clients is at minimum an Apache based VPS server with cPanel or Plesk installed. These types of hosting solutions usually have no connection or inode limits, allow you to setup AutoSSL on your own, and typically come with SSD drives and a lot of bandwidth. VPS hosting typically costs around $35 to $65 per month but is definitely worth it when building an optimized WordPress site.
There are other solutions you might try such as cloud-based hosting, but always do your research and don’t get swayed by things that sound far too good to be true because in most cases they are going to hurt your website, your rankings, and drive users away.
2. Keep Plugins to a Minimum
One of the things that makes WordPress far better than nearly every other CMS option out there is the open source plugin development community. There are plugins for most everything you can think of and if there isn’t a free open source plugin on the repository or a premium plugin for sale that solves your problem, finding someone to custom build it has become really easy.
While plugins offer a ton of functionality and flexibility for building a website with WordPress they also come with a big downside. Adding too many plugins can introduce large images, fonts, javascript, css, and third-party resources that slow your pages down.
One of the most harrowing issues casued by third-party plugins is when resources are called in the head of a page that aren’t even used on it. These unused junk calls slow pages down for absolutely no reason causing a website owner and their users lots of pain without providing any value.
There are ways to add plugins while avoding the nasty side effects they can cause. While WordPress speed optimization plugins continue to vie for superiority in this area, my favorite solution typically flies under the radar. Our team recommends using Asset CleanUp or Asset CleanUp Pro, a plugin that allows you to remove unused css, javascript, and more your pages. This almost always speeds up the site and can improve conversions as fewer users bounce away due to slowness and your bandwidth requirements are also lowered.
Asset CleanUp is one of our recommended WordPress plugins and we offer our WordPress SEO clients a license under our agency free of charge under our WordPress Plugin Library feature.
One way to spot pagespeed issues or potential problems with a plugin is to run a GTMetrix and Google PageSpeed Insights scan on your homepage before and after you install a new plugin. See what the difference is and take action from there.
Only add a plugin if you believe it is absolutely necessary. Remember, you can’t solve all of the pagespeed issues caused by adding a plugin, there are some things you may have to live with. Every website has to make similar choices between a slight improvement in page load speed or having some feature, content, or fuctionality.
3. Use DNS-Prefetch / Preconnect For Third-Party Content
Most website owners and clients aren’t happy when they hear that a plugin they need or an advertising vendor is causing their website to have slow load times or get low scores on some pagespeed testing tool – and when they discover there is little they can do about it.
Website owners in this position do have one trick left up their sleeve for the sake of pagespeed – give the browser better instructions.
When a browser loads a webpage or document it might block some objects from loading until resources are ready. This can be problematic for a website that uses a lot of third party content such as fonts, icons, javascripts, and css files. When the browser realizes it needs a resource it will then open the connection and request the resource then close the connection. Having this happen once or twice on a webpage is not that big of a deal, but modern web documents tend to have a dozen or more these events happening as the page is loading. This makes it so that content loads on the page unevenly, slowly, and shifts around quite a bit.
The solution for these situations, which most WordPress site owners will find themselves in, is to use either DNS-Prefetch or Preconnect tags in thesection of a theme. DNS-Prefetch and Preconnect tags are similar in that they allow a connection to the address to be opened up for when the browser needs it.
There are differences and the decision on which one to use is solely up to you the website owner.
DNS-Prefetch tags simply do the DNS lookup for third-party content just in case the browser needs it. This is efficient for content that might not end up gettin used such as something a user has to click to load or for resources on a page with a higher-than-normal bounce rate.
Preconnect tags do the same DNS lookup but also perform the TCP and TLS lookup. This requires a small amount of server resources per lookup but is incredibly efficient for any third-party content that you know a user will need. For example a font or heading image.
The net effect of using either of these tags is an increased “percieved load time”. Instead of the wonky and slow loading page a web page instead stalls out for a few milliseconds while the connections are all opened up and then the page loads nearly all at the same time (or mostly at the same time depending on other settings). This most often can reduce bounce rates and increase conversions. However, you likely won’t get any bonus points on tools like GTMetrix or PageSpeed Insights. These are likely to complain about the same issues they did before, even though you have used a prefetch or preconnect solution to make the experience better for the user.
Which One Should I Use?
DNS-Prefetch and Preconnect have similar browser support and potential userbases globally these days. However, DNS-Prefetch is probably the best default fit for all WordPress websites as of right now due to its considerably small resource requirement. There is also a way to add these tags to your site via the WP Rocket plugin but not the Preconnect tags and many WordPress themes come default with some DNS-Prefetch tags for addresses to third-party content they use.
Our recommendation is to start off with adding all of the DNS-Prefetch tags that you need and then determine what content you may want to Preconnect instead, understanding that it may consume more server resources and increasingly so as your website or pages gain more popularity.
4. Use an Optimized Theme
When adding a theme to your website you are likely going for design aesthetics over technical SEO or pageload speed. This may hold back your SEO somewhat instead of using a more optmized theme.
Themes built specifically for features or design aesthetics tend to be slower loading and bloated which will cause more problems down the road for SEO and conversions.
Finding an optimized theme is often the tricky part. One way we use is to find a demo version of the theme from the developer’s website and then run this through a page speed testing tool such as WebPageTest, GTMetrix, or Google PageSpeed Insights. We then take the feedback from these tools and theorize how a client’s website might function after switching to the theme.
There are a lot of purported lists of optimized SEO themes out there, we have not researched them enough to determine how accurate they are so proceed with caution.
By switching to an optimized WordPress theme that we found and evaluated, migrated the client site to, then performed further optimizations on – one of our current clients saw a 375% increase in organic traffic after a few weeks of search engines crawling the new codebase.
5. Use a CDN
A CDN also known as a “content delivery network” or “content distribution network” is a network of servers and data centers distributed around a geographic region or the world to provide faster content distribution to users based on where the user is physically located at. Without a CDN your users requests for content go to your host’s physical location which then sends the content back to the users. This can add several extra milliseconds or seconds of page load time depending on where your servers are physically located and where your users are phsically located.
Most web hosting companies won’t tell you where their more basic systems are operated out of, but will tell you the physical location of higher end offerings. This can be problematic for locally based companies that operate in one geographic area where their users are, but their shared server is located thousands of miles away. While this is yet another argument against shared hosting, it is also a great argument for a CDN.
There are a lot of different CDN offerings these days and some that are even free of charge like Cloudflare. A free CDN is a no brainer option to help make your website faster, make users love you more, and more search engines like Google love you more too.
6. Optimize your Robots.txt
WordPress comes out of the box with a pretty well-done Robots.txt file and most websites probably won’t need to make any changes to it. There are situations though where you might want to leverage the Robots.txt file to manage how robots are allowed to crawl your website.
For example SEO bots need to crawl websites to gather data. Sometimes these bots can get a little overly aggressive in crawling your website leading to real impacts on the experience for your users. You could reduce potential problems by giving the bots a crawl delay. Or, maybe you wan to fly dark to your competitors (and your own team) in which case you could find all of the SEO tool bots used by Moz, SEMRush, Ahrefs, Majestic, and others and simply block them with a disallow command.
Another usage case for the Robots.txt file might be blocking foreign search engines for crawling your website if you don’t want any business from there. For example blocking Yandex, a Russian search engine, might be a good idea to for the performance of a website based in Tanzania that only services local users.
You can also use the Robots.txt to keep bots from crawling sensitive pages such as your login pages. Google by default removes pages like /wp-admin from the index already, because the meta robots noindex tag is added to it. However there might be pages you don’t want a search engine to crawl, in which case if they aren’t in the index already and will never get linked to or shared you can block their crawling inside of your Robots.txt.
Finally another way to optimize your Robots.txt is to add a sitemap URL or multiple sitemap URLs for search engines to find. This can help engines crawl your website more efficiently.
7. Remove Tag pages and Media Attachment pages from the index
Tag pages and Media Attachment pages are thin, junk content that search engines do not want to index. By indexing this content it also reduces the amount of time a search engine’s bot might spend crawling your more useful pages.
Tag Pages
Tags can be useful allowing you to dynamically display relevant content to pages based on a narrow topic instead of a more broad category heading. This is a great way to engage readers on pages that might not yet be ready to take action. For example we use them here to display our most recent blog posts relevant to a service on that page to show off our subject matter knowledge. However, that pages that WordPress generates for each tag are just useless to the users of a search engine and there are little ways to dress that up and make them better. Instead, we recommend using the Yoast plugin to remove those tag pages by adding a robots noindex meta tag to all of them. If you are not a Yoast user there doesn’t appear to be any other trustworthy plugin that does this, not even a one-off one.
Media Attachment Pages
Media Attachment pages are another type of junk content generated automatically by WordPress. Every time you upload an image or video to your media library, WordPress creates a page for it with some of the basics like file name, file size, URL, and dimensions. Much like Tag Pages these are considered thin or junk to search engines since they do not offer anything substantial to users.
Our recommendation is to use the Yoast plugin to remove these pages by linking all of your images to your image file instead of the media attachment page itself.
8. Remove Category pages from the index
(if they do not have any text content on them)
Category pages on WordPress websites are a point of contention among SEOs. Some believe they should all be removed immediately and others believe that you should try to optimize them for various keywords. How you handle these is up to you and largely how you post to your website.
If your blog posts go into more than one category, and your category pages do not have extra unqiue content added to them, then it is likely that these categories will not be liked by search engines and they should be noindexed.
If your blog posts go into one category or into very few categories, and your pages have unique content added to them, then this increases the chances that the category pages themselves will be seen as useful to a search engine.
We can look at larger websites here for analogs for example Yelp, Amazon, and Home Advisor. These category pages provide additional value in many cases than simply listing their content for users to browse. Making your category pages more useful could be difficult, require custom development, and may not be the right fit for your website. The simplest formula to follow is to write a block of unique text for each category, make sure you place only one article in a category, and that each category is highly unique.
Still, even if you follow all of the best practices, the liklihood of your categories being index and ranking is often quite low, especially for smaller websites. Larger websites / brands may gain more branded traffic to these category pages even if they don’t drive unbranded organic search traffic.
9. Add structured data
Structured data is a type of data that follows a pre-defined data model and by nature is incredibly easy for search engines to analyze and understand. When SEOs discuss structured data on your website they are most often referring to Schema.org markup and might refer to it as “rich markup” or “data markup” or simply “schema”.
Adding Schema.org to WordPress is incredibly easy today but may in some cases require you to manuall write the HTML code for it.
You can add Schema.org markup by finding themes that support Schema natively, by using the Yoast plugin which supports some Schema, By using one of the dedicated plugins for adding Schema, or by writing it yourself inside of pages, blog posts, theme code, and templates.
Of important note, Schema.org is not considered a ranking factor though it could potentially get you a top ranking spot in Google or Bing if the engines determine the page your marked up data on is the best fit for a featured snippet.
10. Avoid using AMP
AMP was always a little sketchy but recent revelations have uncovered just how dubious the protocol from Google was. Over the past year Google has backed off on using AMP for ranking considerations and for adding news articles to the “Top Stories” section of their search results.
Following good technical SEO standards and working on your page load speed can actually get your site loading faster than AMP would have anyways giving you an edge over your competitors.
11. Optimize Image Filesize
One of the single biggest problems that plague nearly every WordPress website we have worked on is the filesize of images uploaded to the site. Image filesize is one of the main culprits behind slow loading webpages on millions of sites because a high definition image is uploaded to the web and only used to be displayed a 300×300 block.
Instead we recommend finding a way to either optimize your images before you upload them, or if you have enough server resources to use a solution that optimizes your images after they are uploaded to your website.
For optimizing images before you upload them to your website we recommend the Kraken.io service.
For optimizing images after they are uploaded to your website we recommend Imagify.
12. Make sure every image in the media library has an alt attribute
This not only helps improve your rankings, but it could also keep you from being sued by disability advocates. Alt attributes help define to blind users using screen reading software what an image might portray, this makes them part of the Web Content Accessiblity Guidelines (i.e. WCAG 2.1), which in turn has been recommended by the U.S. Department of Justice as a minimum standard for websites to be in compliance with the Americans With Disabilities Act (i.e. ADA of 1990).
Describing your images briefly using an accuate alt attribute isn’t just great of accessiblity however, it is also great for helping search engines better understand the content of your pages.
Adding alt attributes to your images is incredibly easy. Just remember you are trying to provide a brief description of the image not an overly verbose on in-depth one. Think of it more like the keywords that might best highlight what the image is about.
13. Structure pages with one H1 heading and H2 or H3 headings as needed and in appropriate order.
Yet another one that is bound to drive arguments among SEOs and has off and on for decades is the usage of Heading tags and how they are structured.
For our purposes we want to establish a simple best practice to follow. Every page on your site should have only one H1 tag. The H1 tag should be the main subject of the document that all subsequent tags follow. For a blog post or news article this would be headline of your story, for a page this might be a different variation of the title tag.
Each page should have as many H2 tags as are deemed necessary. H2 tags are the sections of the page. In this document for example our Guide heading is an H2 tag as are the sections before it such as the introduction and the questions we answered.
Each H2 should have has many H3 tags as are deemed necessary. H3 tags should only be used where there are sub-items that only fit under one H2 heading and only when there is enough content to deem all of them as a heading. In our guide for example each technical SEO subject is an H3 heading tag under the H2 heading for the guide itself.
We never recommend any usage for H4 or later tags.
14. Optimize your .HTACCESS file (if you have one)
Apache based servers will have an HTACCESS file but IIS and Nginx servers will not. If you have an Apache based hosting server AND you can edit the HTACCESS file you want to optimize it for your WordPress install. WordPress should come preloaded with some optimizations already for URL rewrites.
You can add more optimization to your htaccess file for things like GZIP Compressiom, Expiry Dates, Cache Control, Spam Blocking, Stop directory browsing, and 301 Redirects (see below).
Here are step-by-step instructions on how to stop directory browsing with your .htaccess file.
For page speed related optimizations we recommend allowing WP Rocket to handle those.
For spam blocking and security related optimizations we recommend the 7G Firewall htaccess code.
15. Build 301 redirects in your .HTACCESS file not in a plugin
To keep our exposure to too many plugins reduced we want to build our 301 redirects using the HTACCESS file instead of installing a pointless plugin.
Redirecting using the .htaccess file is simple. Just follow these steps:
- Start a new blank line in your .htaccess file. If this is your first 301 redirect give it a little space from other sections, or also add a heading above it (see examples below).
- The first thing we’ll do is write the word “Redirect” without any quotations or spaces in front of it. This tells the server we’re about to redirect something beyond any other redirects it has coded so far.
- Type a space and then “301”. Again without any quotation marks, but keep a space between “Redirect” and “301” so it looks like “Redirect 301”. This tells the server that we want to send a 301 response code with our redirect.
- Type another space give the full path to your old page wihtout the domain starting off with a “/”. If the page is your old contact page for example the full path might be “/contact/” (again do not use quotation marks).
- Finally type one more space and then the full path to your new page. In our example this might be new contact us page with the address of “/contact-us/”.
- That’s it, you have now written a manual 301 redirect.
- Remember each manual 301 redirect in your .htaccess file will need to be on its own line and you should always keep them all together to make finding and editing them easier in the future.
Our example 301 Redirects from above might look something like this:
# 301 Redirect Section
Redirect 301 /contact/ /contact-us/
# END 301 Redirect Section
Here’s what a 301 Redirect section in your .htaccess file might look like:
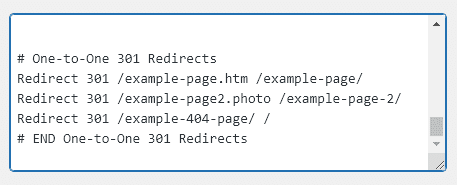
NOTE: It’s 2023 and some WordPress websites may not have .htaccess controls. This is largely due to the webhosting company WP Engine deprecating this feature but might also be due to a hosting system using Nginx over Apache. When this happens you will often have no choice but to use a plugin for redirects. In this case I recommend the “Redirection” plugin by John Godley which you can find here: https://wordpress.org/plugins/redirection/
16. Setup a Google Search Console for your website
Google offers a portal filled with data and tools to help you optimize your website. This system used to have very few positive features but over the past several years has become a highly valuable free tool from Google. From here you can see what Google thinks about your content, find tehnical errors to fix, submit your URLs for evaluation, see what keywords users use to find your content, and see traffic / impression / average ranking data directly from Google’s search engine.
17. Submit Your XML Sitemaps to Google and Bing
XML Sitemaps now come standard with WordPress or you can use the ones generated by Yoast or other plugins. These work best when directly submitted to the main search engines via the portals they offer website owners / webmasters / SEOs.
18. Properly Handle Duplicate Content
Duplicate content can cause a myriad of problems on your website from having the wrong piece of content indexed, to harming how other content on your website gets indexed. The most basic approach here is to find duplicate content and remove it either by deleting the duplicate versions or by noindexing those versions with a meta robots noindex tag.
There are cases where duplicate content is necessary for the business operations of a website. When this happens you want to make sure to handle the duplicate content in the most optimial way for your web business.
For example if you are an ecommerce merchant selling tens of thousands of products many of which are similar and all of which use the manufacturer’s description as the product description, then you have a website filled with duplicate content. The solution here is most often to; Write unique descriptions for the most important products, write boilerplate content for product variations swapping out things like colorways or features, try to gain unique content from customers by gathering reviews and product feedback, and by slowly writing new descriptions for products on the site.
If you are a news website you are bound to have quoted a famous person or posted a press release. When you quote someone you want to make sure to write unique content around the quote. When you publish a press release you can either noindex it, place all of them on a subdomain, or for press releases that might drive more traffic have a writer place a one or two paragraph description of the press release.
If you are an international website and you have content in the same language but targeted at different countries you want to make sure to use the correct HREFLANG canonical tags to direct engines to the correct version for them to display.
19. Fix 404 Errors
404 Errors harm a website by killing of inbound SEO value being passed through links and by giving users a poorer-than-expected experience. You can find these via your own server log reports, via crawling tools like Screaming Frog, or by using Google Search Console.
How to fix your 404 errors
Our recommendation is to determine if a page is broken because the content is gone forever or if it just changed addresses (i.e. new URL). If the content is gone forever and is unrelated to any other content on your website you should give it a 410 Gone response code. You can do this using the .htaccess file if your server allows for one, or you can use a WordPress plugin.
If the content is gone forever but is highly related to other content on your website you should redirect it to tht content. For example if you sold a brand of shoe called “Super Shoe” and they discontinue a colorway called “Super Plaid” you could redirect your Super Plaid product page to the main brand page for Super Shoe.
If the content is gone forever but is only loosley related to other content on your website try and find the best fit for a redirect. When all else fails redirect the content to the homepage, though search engine employees have warned this may not always be something they deem as valuable, it will at least remove the 404 error and give engines less content to focus on.
20. Fix Crawled Not Indexed Errors
One of the newest boogeymen for SEOs is an error in Google Search Console titled “Crawled – Not Currently Indexed”. This error means that Google was able to find your content but decided against indexing it. Since indexing is the first step towards higher rankings we obviously want to fix this issue.
When asked about this error in the summer of 2021 Google’s John Mueller said
“You can’t force pages to be indexed — it’s normal that we don’t index all pages on all websites. It’s not an issue with “that page”, it’s more site-wide. Creating a good site structure and making sure the site is of the highest quality possible is essentially the direction.”
To fix these issues you need to take skeptics view of your own website and ask yourself where the quality is lacking. In many cases we’ve seen this error be resolved through improved internal linking and external linking from quality sources. In a few other cases the problem appeared to go away with more branded links to the homepage. In others the problem appears to resolve itself over time.
A big issue for WordPress sites are the “/feed/” pages appearing under this report. These are XML feeds of every page and post on your website which by default Google does not index. If you see these in the Crawled – Not Currently Indexed report you can likely safely ignore them.
Instead look for more important pages such as a blog post, a how to guide, or even one of your main product/service pages.
Before trying to fix anything make sure that the report is accurate. There is a lag between systems at Google and while the search engine may have not indexed your page, by the time you find error it could already be indexed. It’s best to look for the page in Google’s results using a site colon search or by pasting the full URL in the search box on Google.com’s homepage.
If you do find a problem with an important page not being indexed here’s our recommended path:
- Make sure that the page is not excluded due to the Robots Noindex Meta Tag (rare) or Robots.txt (super rare).
- Make sure the page is not duplicated on your site anywhere.
- Review the content of the page and ask yourself if it is of good quality and uniqueness.
- Review the top ranking page for your target keyword and compare it to your page looking for differences.
- Review how many times you internally link to the page. If the links are all from main or footer navigation, or frome a page 2 or 3 layers deep, make a plan to build fresh internal links to the page.
- Review how many external links point to the page and the quality of those. If you see anything super low quality disavow it just in case. If you have none, make a plan to get even nofollow links to the page.
- Ask Google to recrawl the page inside of GSC.
- Wait a few weeks and see if the page is now indexed. If not, you may need to consult an SEO or repeat these steps being more critical of your own site.
21. Make Sure Your Content is “Helpful”
This is a technical SEO guide, so why are we talking about content here? Well, this new update is focused on content, but it might fall to a technical person to fix it which we explain below.
In August of 2022 Google announced a major change to their search algorithm ranking systems that introduced a brandnew site-wide ranking signal. Called the Helpful Content Update this update introduced a new ranking signal which some call the HCU but which we will refer to as the “helpful content signal”. The new signal essentially determines if a page is helpful or not helpful then applies a corresponding classifier to that page. If a page is helpful it essentially gets positive points, if the page is considered unhelpful it gets negative points. Google’s sytem then uses a weighted system which we know little about to derive a site-wide score (yes, an actual one that exists) which is then applied as part of the total ranking formula.
Further confusing things a page can have some content that is not helpful, but itself be considered helpful and a page can have helpful content but be considered not helpful.
Essentially what this means is that if you have more pages that are considered ‘helpful’ by Google’s system, you will ensure a higher score and possibly achieve higher rankings.
That means we have to understand what the heck Google’s algorithm thinks is helpful to know what to create or what is not helpful to know what to avoid creating. This update hasn’t been around very long and has only had one refresh so the data we have is still very little at this time, but we can at least take some educated guesses as to what might be helpful vs. not helpful.
1. If the content was generated by an A.I. and not a human. – Then it is likely going to be considered not helpful. Part of the Helpful Content Updates goals was to help surface content made by human experts for humans. Right after Google’s Helpful Content Upate ChatGPT was released and it seems the era of A.I. generated content is well underway. Part of this update was designed to fight the engine behind ChatGPT, GPT-3
2. If the content is wildly off topic. – Suppose you run a website all about Death Metal bands but one of your content writers creates an article titled “The Top 25 Country Music Artists of All Time”. The article itself might be really well-researched and it might even be the best such article on the web, but since it is on a website all about Death Metal it will at the very least get classified as not helpful and likely will get demoted in the rankings.
3. If the content is riddled with errors. – You hired a writter from Pakistan to write an article about the best hot dog stands in New York City. They got a lot of it wrong, maybe even used street names that don’t exist. Before the Helpful Content Update this article still might have ranked well based on inbound links, entity saliance, semantic associations, and the fact that it ranked more hot dog stands than any other such article. However, this update might be using some NLP or even a Large Language Model to determine that your article is in fact either widly outdated or just flat out wrong.
4. Every blog post on your website is exactly 500 words. – Content agencies have a big problem, it is much easier to sell content on a per word basis as that is typically how they pay copywriting contractors. It makes it super easy to sell a client an exact specific word count every time giving them flatrate pricing and good content simultaneously. However, a search engine might see this as not very helpful. If the intent of the content was to be useful to other humans surely the length of said content would vary sometimes a little or possibly even wildly.
5. If your content feels like it was written purely just to rank on a keyword. – Does the content feel flat? Do you notice any old school keyword stuffing tactics or even newer tactics in the content? The Helpful Content Signal might classify a piece of content as not helpful if it appears to be written just to rank in Google.
6. If a piece of content covers an important topic, but is not internally linked well. – If a piece of content like, say a guide, is buried on your website from the Fade Out Effect or even on purpose, it could be seen as less helpful or even not helpful by the classifier.
To better understand if the Helpful Content Update / Helpful Content Signal is imapcting you there are a few things you as a technical SEO can do.
1. Check the word count at the bottom of several of your blog posts. If these are identical or almost identical have someone on your team rewrite that content.
2. Look for thin but necessary pages on your website and get content added to them. For example a product category listing on an ecommerce site should at least have a few sentences at the bottom under the products to help consumers decide, if blog categories are deemed necessary then these too should have a few sentence of content explaining the category. Real Estate agent’s might have various neighborhood pages or price range pages with listings but no written content or even worse they may not have listings at the moment due to the dynamic nature of real estate.
3. If you are not aware, ask how your team is getting copy created. If they are hiring outside contractors ask them where they are coming from. If those contractors are from another country you should be extremely suspicious.
4. Run any content that you suspect might be getting classified as not helpful through an A.I. content checking tool to see if there’s a high liklihood it was written by a Large Language Model or other type of A.I. bot. These are few and far between at the moment, but should become more abundant in time.
5. Look for pages in Analytics (Google Analytics UA right now, not GA 4 which is a dumpster fire) that lost traffic during HCU update periods (August 25th, 2022 – September 9th, 2022 and December 14th, 2022 – January 12th, 2023). Ask questions about the content on these pages such as “Does this content fit our site?”, “Is this content factual or useful in any way?”, “Does this content feel like it was written just for SEO?”.
6. Examine your internal linking strategy. If you rely solely on navigation and footer links for content, you might notice a harder time getting that content indexed or ranking well. Find ways to make internal linking better and easier, for example automatically building internal links across your site.
The above WordPress Technical SEO Guide was created to help anyone master the Technical SEO of their website. If it looks like a lot, it is. We are experts at all facets of WordPress SEO including fixing technical SEO issues and managing technical SEO for increased performance over time as the web changes. If you need help and you are looking for experts dedicate to your success we want to work with you. Contact Us and let’s see how we can improve the techncial SEO for your WordPress site today!
Have any technical SEO questions to ask? Think we should include something else in this guide? Let me know in the comments. This guide will be continually updated.
Originally published: November 16th, 2021 at 09:30am
Updated on: January 26th, 2023 at 7:18pm