In this Shopify tutorial we’re going to show you how to add badges to your products on Shopify. You’ll learn how to add animation to your badges and assign badges to specific products. This how to guide is a collaboration between Seán Mythen on YouTube and us here at Joe Youngblood SEO & Digital Marketing Consulting. If you’re a Shopify developer or a shop owner we highly recommend you subscribe to his YouTube Channel for more awesome tip videos in the future.
Why add custom badges to your products? Product badges can really help a product stand out from the rest on a collection page. This can improve your marketing efforts from Shopify SEO, Paid search or paid social, influencer marketing, email, and other sources by geting your shopper’s attention on the products you want them to see which will drive more add to carts – and ultimately increase sales.
Watch the video here:
Step #1: Determine What Badge You Want to Add to Your Products
Some ideas are:
– Hot
– New
– Staff Pick
– Bonus Pack
– Deal
– Sale
– Fresh
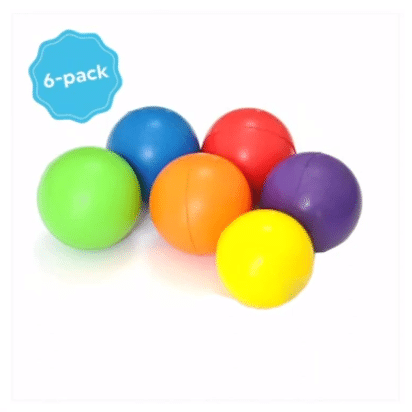
In this tutorial we’ll be showing you an example adding a badge to highlight products that come in a six pack.
The end result will be one product with a badge that looks something like this
Step #2: Select Products You Want to Add Your Badge To
This might sound simple, but it should be one of the first steps in adding badges to your Shopify products. You have to know which ones your going to add the badge to.
We recommend making a list of the products and placing them in an Excel or Google spreadsheet. In the spreadsheet you should include columns for the product name, sku, URL, badge, badge name, and product tag (see Step #3).
This will especially come in handy if you’re planning on adding and removing badges frequently or working with a team of marketers / devs to create and deploy product badges.
Step #3: Create a Unique Product Tag and Add To Selected Products
To make sure our badge only goes on the products we want it to we are going to need to create a unique product tag which we will use later on in this tutorial. For example if you are trying to highlight a bunch of products for spring you could tag them as “spring-2022-pick” or if you wanted to add a badge to products made in the USA you might use the tag “made-in-usa”.
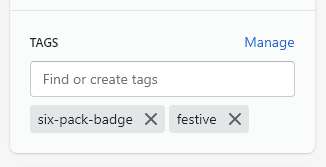
In our example we (based on Sean’s video) will be using “six-pack-badge” as our product tag.
You can add this tag to your product page by editing the selected product(s) and adding the tag under TAGS on the right-hand side. Like this:
Step #4: Make Your Badge Graphics
Sean loves using Canva for this, but you can use any graphic design software you want. If you’re using Canva search for “badges” and you’ll find quite a few options to select from.
Sean has some great tips for those using Canva to make their badges:
- Always save as a PNG with a transparent background.
- Make sure you have the badge graphic as close to the edges as possible to reduce unneeded whitespace.
- Create your badge as a square at 300 pixels x 300 pixels.
- Before uploading your badge graphic to Shopify make sure you compress it using a tool like Kraken or TinyPNG.
If you’re not a web designer you can probably hire a gig worker or ask someone in your design department to make the badge graphics. Make sure to show them the above bullets or this guide so they have a good idea of what you’re requesting.
Step #5: Upload Your Badge to Shopify
To do this go to Settings > Files and upload the optimized version of your badge graphic.
Step #6: Duplicate Your Live Theme
Now we need to make some edits to the theme so we can use the badge. This guide should work with most Shopify themes, but Sean’s video was done with the Dawn theme for Shopify. Just in case it doesn’t work or this causes some unforseen issues we want to work on a test theme first.
Go to Online Store > Themes > Actions > Duplicate
Step #7: Find the Code to Target our Image
In the dropdown of your duplicated theme go to Actions > Edit Code. This brings up the code editor of your store.
To find where we want to put the code click on the preview button at the top of your screen.
Find the collection page with the product or products on it we want to add the badge to. Then right click (in Chrome) and select “inspect”. You’re looking for the class of the container above the target image.
Step #8: Edit the Target Image Code
Now that we know what class to look for we want to go back to the code and find the code that renders collection pages.
Once you find your collection code you want to look for the section that displays the products. It should look something like this:
<li class="grid_item">Inside of this code you should see reference to another section of code that is responsible for brining in the product card. It should look something like this:
{% render 'product-card'You want to click into this section of code.
Inside of this code you’ll be able to find the classes we found earlier and the code for displaying images.
Step #9: Add a Custom Class to Hold the Badge
Now that we’ve found the container with the classes we found earlier inspecting our page, it’s time to add a little custom code to display our badge.
At the start of the class attributes section of the Div tag write your custom class, like:
Before:
<div class="media media--transparent media"After:
<div class="six-pack-badge media media--transparent media"Step #10: Add the Badge to Your CSS Code
We now have a custom class placed inside the container where we want our custom badge to appear. Now it’s time to bring the badge in using CSS.
In your code editor screen go up to the search box on the left-hand side and look for “css”.
Your Shopify theme might have more than one CSS file. Choose the one you think is most appropriate and open it up to edit.
Write the following code to style and position your badge:
.six-pack-badge::after{
  position: absolute;
  content: '';
  background: transparent url(/six-pack-badge.png) no-repeat center/contain;
  width: 25%;
  height: 25%;
  top: 20px;
  left: 20px;
}
Step #11: Select Products to Display The Badge On
You may have noticed that your badge is currently appearing on all of your products. Obviously we want our badge to only appear on certain items, to do this we’ll be using product tags.
We want to find the code where we added the new custom class in Step #6 and add in some liquid code to make sure the badge only loads if our chosen tag is on our product.
In this example Sean is using the product tag “six-pack-badge”. You’ll add a liquid if statement before the CSS class and then add an endif to close it making sure to leave a space after the endif and before the next class.
In Sean’s example the badge CSS code looks like this:
{% if product.tags contains 'six-pack-badge' %}six-pack-badge{% endif %}This code should work on most standard themes but on the Dawn theme and a few others that use snippets you’ll have to make another modification. Look back at your code for the collection page and you might see a line of code where the product data is passed that looks something like this:
{% render 'product-card',
product_card_product: product,
This means in our code instead of “product.tags” we want to use “product_card_product.tags”. The example would then look like this:
{% if product_card_product.tags contains 'six-pack-badge' %}six-pack-badge{% endif %}Step #12: Add Animation to Your Badge (optional)
You can also add some animation to your badge using CSS. This is not necessary, but Sean included it and we thought it might help make your websites more engaging.
Here’s the full animation CSS from Sean’s video, add this to the same CSS file where you added in the badge graphic.
@keyframes shake {
  0% { transform: rotate(0deg); }
  10% { transform: rotate(-15deg); }
  20% { transform: rotate(15deg); }
  30% { transform: rotate(-7deg); }
  40% { transform: rotate(7deg); }
  50% { transform: rotate(0deg); }
}

.card-wrapper::hover .six-pack-badge::after {
  animation: shake 1.5s;
}
Have questions or want to add to this tutorial? Let us know down in the comment below!
If you’re into Shopify dev stuff we highly recommend subscribing to Sean’s YouTube Channel.
We found this great video on YouTube and got Sean’s permission to write this tutorial based on his video. Some of the screenshots above are from Sean’s video and some from our own experimental implementation.


